Have you been raising aquarium fish and cultivating bonsai trees separately for a long time?
In that case, making bonsai driftwood for your tank can never go wrong!
But, are you having a hard time getting started? If that’s so, you have come to the right place. This post will outline the simple steps of how to create your own aquarium driftwood.
Keep reading and get ready to learn!
How to Make Aquarium-Friendly Bonsai Driftwood
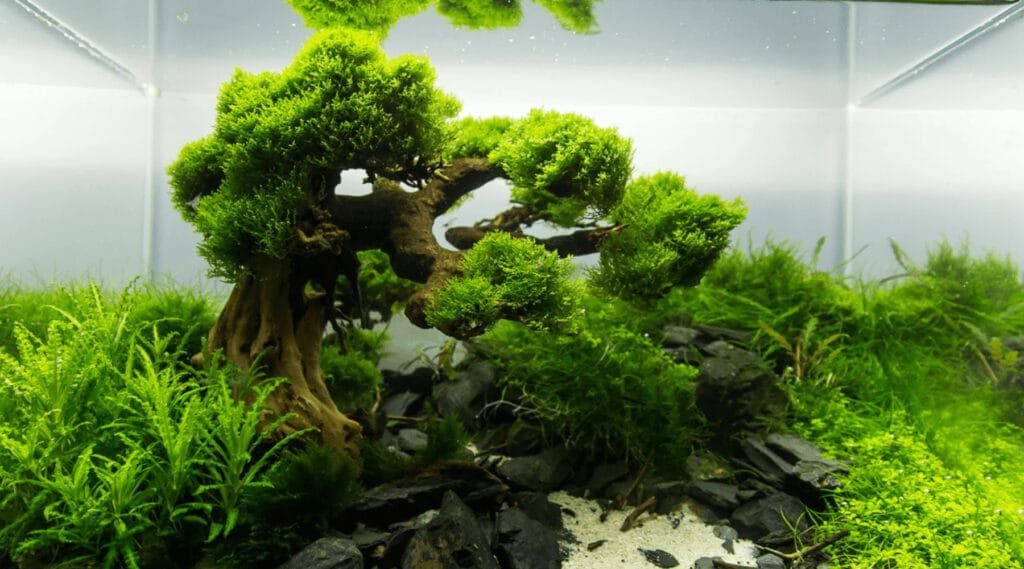
The addition of bonsai driftwood to an aquarium can significantly alter its appearance and transform it into a tropical, zen-like paradise.
Even though the bonsai driftwood you use in your aquarium isn’t a real bonsai tree that you’ve planted in the tank, it can nevertheless improve the aesthetics of your environment for both you and your fish.
The most practical approach to incorporating bonsai driftwood into an aquarium is to buy it from a retailer, but the price can soon mount.
In light of this, as a bonsai enthusiast, learning how to make your own bonsai driftwood for your aquarium must be a challenge you have to accomplish with passion and commitment.
Process
By taking a few easy steps, you may create your own bonsai aquarium tree made out of driftwood. Let’s go over these procedures in general.
- Gather the materials.
- Come up with a design.
- Cut and soak the woods.
- Take the bark off.
- Sterilize and sand down the woods.
- Connect each piece of wood.
- Bond driftwood on stone.
- Create the leaves.
- Place driftwood into the aquarium.
Without a solid understanding of the stages, we know that it is impossible to follow them. Therefore, now is the time to learn each step completely.
1. Gather the Materials
Finding the right material is unquestionably the most crucial step in building bonsai driftwood from scratch for an aquarium.
The cost of store-bought bonsai driftwood for an aquarium is in part due to the amount of time needed to gather the necessary materials.
Fortunately, you, too, can get the ideal bonsai driftwood for your aquarium with a little perseverance.
The branches of floating aquatic plants in varying sizes must be collected from rivers, lakes, or streams. However, it will sometimes leave you disappointed, so you should have a backup plan if gathering the floating dry wood proves challenging. You can utilize the wood from certain trees for this. However, in order to make them float, you do need to invest more energy.
Woods Suitable for Aquariums
- Apple
- Alder
- Birch
- Beech
- Cherry
- Guava
- Hawthorns
- Indian almond
- Mango
- Oak
- Pear
- Sycamore
You must pick wood that won’t harm the fish or the aquarium’s water chemistry.
2. Come Up with a Design
While it may be tempting to improvise and build your bonsai driftwood from scratch, planning out exactly how you want your bonsai driftwood to look will undoubtedly help you with this aquascaping challenge.
Set goals for yourself by doing anything as easy as sketching something out on paper, imitating a species of bonsai tree like juniper, jade, or North Island Pine, or adopting a style like sumo or informal upright.
This must be done after gathering your resources so that you are aware of the various sizes and appearances of the wood you will be working with.
For instance, you could create bonsai driftwood with several branches if you came upon a root stump formation with different roots.
However, if you have only discovered 2 or 3 somewhat straight and narrow pieces of wood, this will influence how your tree looks.
By doing that, you’ll have something to strive for, and the process will go more smoothly.
Although you may always adjust this as you go, we can tell you that it is not worthwhile to miss this step.
3. Cut and Soak the Woods
The thin branches of the driftwood must be cut using bonsai shears or scissors once it has been obtained since they are undesirable for making driftwood. After that, give the branches a good soak, making sure to keep them totally submerged. While doing so, a heavyweight can be added to the trees.
The outermost part of the branches will become soft enough to peel the bark if you soak them in water for 2-4 weeks. The tannins will disintegrate into the water after soaking, making the wood aquarium-safe. Every week, you must refill the branches with fresh water and replace the old soaking water.
4. Take the Bark Off
You will observe the tree barks emerging from the woods on their own after two to four weeks. Peel the wood’s bark completely; use a knife to remove the bark’s pointed corners. After that, they will now appear new and look fresh.
5. Sterilize and Sand Down the Woods
This time, you need to keep the wood fish-safe. There are two ways you can go about doing it. Boiling the wood is one way; adding liquid carbon is another.
Applying liquid carbon dioxide with a brush to every piece of wood will eradicate germs, fungi, spores, and algae to the greatest extent possible. Once done, off you go to the next part.
Sanding is a crucial step in creating a rough surface, and this roughness aids in effectively holding the joint together. You can gently rub the wood where you need to join them with a small portion of wood sandpaper. To make your space rough, sand it for two to five minutes.
5. Connect Each Piece of Wood
Consider how your bonsai driftwood design will look before attaching the various pieces of wood together. For a successful execution of your idea, you can first sketch out the design on paper. Here, you may also choose between two techniques: one that involves a drill and nails, and the other that uses wood or epoxy glue. To make your driftwood bond durable, you can combine these two methods.
6. Bond Driftwood on Stone
Following the attachment of all the dried wood pieces, your driftwood is complete and ready. However, its lowest portion lacks bonsai soil. Therefore, to enable it to stand alone, you must bind a tiny piece of stone with it. The stones that are currently in your aquarium can be used.
Depending on how much driftwood you make, bring one or two pieces of stone. Place the lower portion of the driftwood on the stone using super glue. It will provide you with a long-term bond in a matter of seconds. However, it takes 24 hours to totally complete it.
7. Create the Leaves
Without leaves, your bonsai driftwood appears strange and artificial. Therefore, you must fasten leaves to the tips of each driftwood branch. One of the finest methods for making leaves that are as natural-looking as they are green is to use moss. You may choose Marimo Moss, Java Moss, and Christmas Moss among the various types of moss available on the market.
To turn moss into leaves, you must unfurl them first. Then use super glue to attach one ball of moss to the top of each branch of your driftwood. Your driftwood will appear very stunning and be suitable for placement in the aquarium once you have finished bonding all of the leaves on each branch.
8. Place Driftwood into the Aquarium
You’ve finally reached your most anticipated moment: adding the driftwood to the aquarium. After placing the driftwood gently, carefully close the tank cover.
Wrap Up
Deadwood pieces of wood that have been put together to resemble an underwater bonsai tree are used to create bonsai driftwood for aquariums. A Driftwood bonsai is not a regular bonsai tree that has been submerged.
Begin assembling the supplies for your bonsai driftwood project so that it can be used to decorate your home.
Visit our blog section and learn more amazing things about bonsai!

