Undertake the delicate art of bonsai repotting, a nuanced process that harmonizes precision with patience. Begin by preparing a new pot with a well-draining soil mix, carefully selected to support the miniature tree's unique needs. Gather specialized tools, including bonsai shears and root hooks, to guarantee a successful repotting experience. Gently remove the bonsai from its pot, inspecting the roots for signs of damage or decay. Prune and trim the roots to promote healthy growth, then pot the bonsai in its new home, taking care to settle the soil and provide adequate water. As you tend to your bonsai's new beginnings, the path to mastery unfolds before you.
Key Takeaways
- Select a new pot with adequate drainage holes and a well-draining bonsai soil mix to prevent waterlogged soil and support the tree's growth.
- Remove the bonsai from its pot gently, taking care not to damage the delicate roots or disturb the soil, and inspect the roots for signs of damage or disease.
- Prune and trim the roots using sharp, clean bonsai shears to promote healthy growth, refining the root system, and preventing root rot or disease.
- Place the bonsai in the new pot, ensuring the root flare is level with the soil surface, and gently spread out the roots for a balanced distribution.
- Water the soil gently to settle the repotting mix, and provide consistent moisture levels while monitoring the tree's responses to ensure a successful repotting experience.
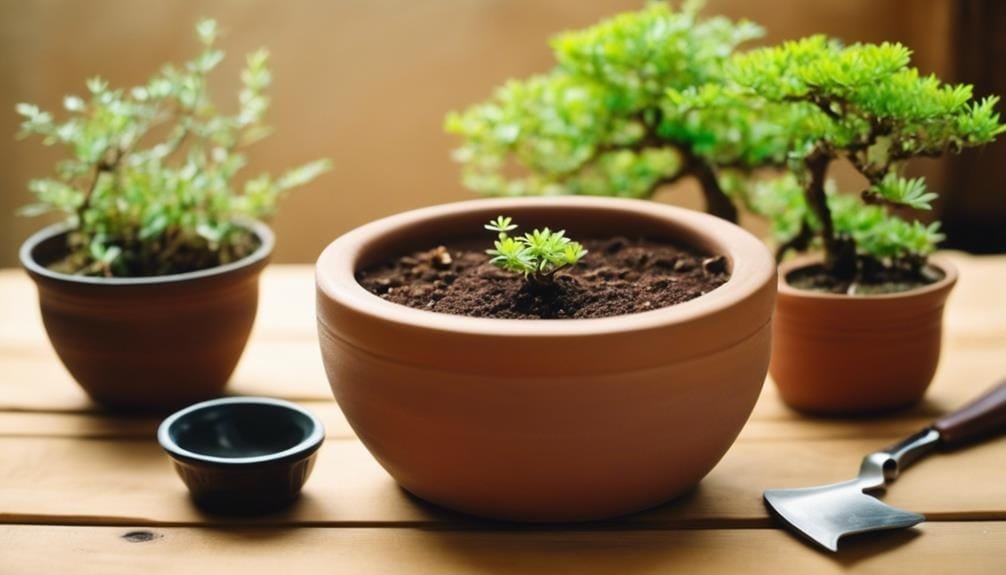
Preparing the New Pot and Soil
Before repotting, select a new pot that is slightly larger than the previous one, with adequate drainage holes to prevent waterlogged soil, and fill it with a well-draining bonsai soil mix specifically designed to support the unique needs of your miniature tree.
This vital step sets the stage for a successful bonsai repotting experience.
Choose a high-quality bonsai pot that complements the aesthetic of your tree, guaranteeing a harmonious balance between the two.
The new pot should provide ample room for the roots to breathe and grow, while the bonsai soil mix should retain moisture without becoming waterlogged.
A well-draining mix will prevent root rot and guarantee the tree receives the necessary nutrients for peak growth.
When selecting a bonsai soil mix, look for one that is specifically formulated for bonsai trees, as it will contain the necessary nutrients and pH balance to support the tree's unique requirements.
Gathering Essential Repotting Tools
With the new pot and soil prepared, attention now turns to gathering the specialized tools required for a successful bonsai repotting experience.
As we plunge into the world of bonsai cultivation, having the right equipment is vital to equip ourselves with the right instruments to handle the delicate bonsai roots with care. A bonsai repotting guide would not be complete without emphasizing the importance of these tools.
To begin, a pair of sharp bonsai shears for bonsai root pruning is necessary, allowing us to carefully trim and shape the roots to promote healthy growth.
Next, a set of root hooks will come in handy for gently teasing out the roots, ensuring they're free from any tangles or knots.
Chopsticks or a root rake can also be used to loosen the soil and separate the roots from the old potting mix.
Additionally, a soft-bristled brush will help remove any remaining debris from the roots.
Removing the Bonsai From Its Pot
As we undertake the delicate process of removing the bonsai from its pot, it is essential to approach this step with gentle reverence, carefully grasping the tree to avoid causing any unnecessary stress or damage.
The next vital steps involve identifying the root boundaries, which have likely become intertwined with the potting media, and releasing the potting constraints that have held the roots captive.
Gently Grasp the Tree
To successfully remove the bonsai from its pot, it is crucial to gently yet firmly grasp the tree, taking care not to damage the delicate roots or disturb the soil.
This initial step sets the tone for the entire repotting process, requiring a gentle, respectful touch that honors the bonsai's intricate root system.
As you prepare to grasp the tree, take a moment to appreciate the care and attention that has gone into nurturing this miniature marvel.
Consider the bonsai care and techniques that have shaped its growth, and the bonsai aftercare that will safeguard its continued health and vitality.
With a steady hand and a calm mindset, carefully wrap your fingers around the trunk, taking care to avoid compressing or constricting the roots.
Hold the tree firmly but gently, much like you would cradle a delicate flower, and slowly begin to lift it from its pot.
As you do, take note of any signs of root bound or soil compaction, and prepare to address these issues in the steps that follow.
Identify Root Boundaries
The bonsai's root system, now exposed, requires a careful examination to identify its boundaries, a pivotal step in determining the extent of any root bound or soil compaction issues. As a beginner, understanding that identifying root boundaries is imperative in preventing damage to the delicate roots. A thorough inspection will reveal any signs of root bound, such as circling or tangled roots, which can impede the bonsai's growth.
| Root Condition | Description |
|---|---|
| Healthy Roots | White, firm, and growing outward from the trunk |
| Root Bound | Circling, tangled, or growing in a circular pattern |
| Soil Compaction | Hard, dense soil that resists water penetration |
| Root Damage | Broken, cut, or torn roots, which can lead to disease |
| Ideal Root Zone | A well-balanced root system with a mix of fine and coarse roots |
Release Potting Constraints
Gently grasping the pot, carefully invert it to loosen the bonsai, allowing it to slowly release from its container. This delicate process requires patience and finesse, as the goal is to minimize disturbance to the roots and soil.
As you invert the pot, gently rock it back and forth, encouraging the bonsai to dislodge from its pot-bound state.
Key Considerations for Releasing Potting Constraints:
Handle with care: Bonsai trees are delicate, and rough handling can cause irreparable damage to the roots and trunk.
Work slowly and patiently: Rushing this process can lead to unnecessary stress on the tree, potentially causing it to decline.
Support the tree: As you invert the pot, guarantee the bonsai is securely supported to prevent it from falling or becoming dislodged.
Observe and adapt: Pay attention to the bonsai's response to being released from its pot, and adjust your technique as needed to minimize stress and discomfort.
Inspecting and Pruning the Roots
Root-bound bonsai trees, characterized by a dense, circling mass of roots, require careful pruning to prevent further constriction and promote healthy growth.
As you gently tease out the roots, inspect them for any signs of damage, decay, or disease. Prune away any dead or damaged roots with precision, using sharp, clean bonsai shears to prevent spreading infection.
This delicate process demands patience and attention to detail, as you work to free the roots from their tangled web. As you inspect the roots, take note of any areas where they may be constricted or circling, and plan your pruning strategy accordingly.
Trimming and Shaping the Roots
As we gently unearth the roots, it becomes apparent that trimming and shaping are vital steps in the repotting process, allowing us to refine the root system and promote healthy growth.
With precision and care, we will employ root pruning techniques to identify and remove dead roots, making way for a robust and thriving network.
Root Pruning Techniques
Pruning the roots of your bonsai tree is a critical step in the repotting process, as it allows for the removal of any dead or damaged roots, encourages healthy growth, and helps to establish a balanced root system.
This delicate process requires finesse and attention to detail, but with the right techniques, you can create a thriving foundation for your miniature tree.
When pruning the roots, keep the following techniques in mind:
- Identify and remove crossing roots: Gently tease apart any roots that are tangled or crossing, and remove any roots that are growing inwards towards the trunk.
- Cut back long roots: Trim back long roots to encourage bushy growth and prevent the root system from becoming leggy.
- Thin out dense areas: Carefully remove roots in dense areas to promote air circulation and prevent root rot.
- Leave some roots intact: Be sure to leave some roots intact to confirm the tree can still absorb nutrients and water.
Identifying Dead Roots
With the pruning techniques in mind, attention now turns to identifying dead roots, a vital step in trimming and shaping the roots to guarantee a healthy and balanced root system.
Dead roots can be detrimental to the bonsai's overall health, causing decay and nutrient deficiencies.
To identify these roots, gently remove the bonsai from its pot, taking care not to disturb the soil. Examine the roots, searching for signs of decay, such as soft, mushy, or brittle textures, as well as discoloration, like black or brown hues.
Healthy roots, on the other hand, should be firm, white, and fibrous.
Use a pair of sharp, clean bonsai shears to carefully trim away any dead roots, making clean cuts just above a node or junction. This will prevent the spread of decay and encourage the growth of new, healthy roots.
Selecting the Right Repotting Mix
Every bonsai enthusiast knows that a well-chosen repotting mix is crucial to their miniature tree's health and stability, as it provides the necessary balance of moisture, aeration, and nutrients for ideal growth.
A high-quality repotting mix guarantees the roots receive the necessary oxygen, water, and nutrients, promoting healthy development and preventing root rot.
When selecting a repotting mix, consider the following essential components:
Organic matter: Peat moss, coconut coir, or compost provide moisture retention and aeration.
Inorganic matter: Perlite, vermiculite, or sand improve drainage and prevent waterlogging.
Fertilizers: Balanced fertilizers, such as 10-10-10 NPK, support healthy growth and development.
pH balancers: Additives like dolomitic limestone or sulfur maintain perfect pH levels, certifying nutrient availability.
Potting the Bonsai in Its New Home
The newly prepared pot, filled with the carefully selected repotting mix, awaits the bonsai's arrival, its clean and well-draining environment ready to support the tree's future growth and development.
Gently place the bonsai in the pot, taking care not to disturb the roots or disturb the surrounding soil. As you settle the tree into its new home, envision the roots spreading out, establishing a strong foundation for the tree's continued growth.
Guarantee the root flare, where the trunk flares out at the base of the tree, is level with the soil surface. This allows for proper water circulation and prevents water from collecting around the trunk.
Using chopsticks or a root hook, gently spread out the roots, working from the bottom up, to create a balanced and even distribution.
As you work, take a moment to appreciate the delicate beauty of the bonsai, its intricate branches and tender roots a tribute to the art of cultivation.
Watering and Settling the Soil
Once the bonsai is securely positioned in its new pot, attention turns to gently watering the soil to settle the repotting mix and provide enough moisture to support the tree's initial recovery.
Watering at this stage is vital, as it helps to remove any air pockets in the soil, allowing the roots to breathe and absorb essential nutrients. Begin by gently pouring water over the soil, making sure not to wash away the delicate roots or disturb the soil structure.
Water thoroughly: Verify the water drains out of the pot's holes, indicating that the soil is fully saturated.
Avoid overwatering: Don't let the pot sit in water, as this can cause root rot and other problems.
Monitor the soil: Check the soil regularly to verify it's not drying out too quickly or staying too wet.
Be patient: Allow the soil to settle and the tree to recover before resuming regular watering and care routines.
Providing Initial Aftercare Treatment
Following repotting, the bonsai tree requires gentle, attentive care to facilitate a smooth shift and prevent potential setbacks.
During this critical period, providing a nurturing environment that fosters recovery and growth is crucial.
Begin by placing the bonsai in a shaded area, protecting it from direct sunlight, which can cause stress and dehydration.
Maintain consistent moisture levels, watering carefully to avoid washing away the delicate roots.
Monitor the tree's temperature, ensuring it remains within a comfortable range to prevent shock.
As the tree adjusts to its new surroundings, observe its responses, making adjustments as needed.
Be patient and gentle, recognizing that the bonsai is vulnerable and in need of care.
By providing a tranquil and supportive environment, you'll help your miniature tree thrive, its roots growing strong and healthy, its branches reaching for the sky.
With tender attention, your bonsai will flourish, its beauty and elegance unfolding like a delicate flower.
Ongoing Care and Maintenance Tips
As your bonsai settles into its new home, paramount importance lies in establishing a harmonious balance between nurturing and restraint, allowing the tree to flourish while avoiding excessive pampering.
In this delicate dance, consistent care and attention to detail are pivotal, and a well-planned watering schedule and seasonal pruning reminders become the cornerstones of a thriving relationship.
Watering Schedule Essentials
Proper watering is essential to a bonsai's health, and establishing a consistent schedule is imperative to prevent overwatering, which can be detrimental to the tree's delicate root system.
A well-planned watering schedule guarantees the soil is consistently moist but not waterlogged, allowing the roots to breathe and absorb essential nutrients.
To achieve this balance, consider the following essential factors:
Soil moisture: Check the soil daily, and water only when it feels dry to the touch.
Weather conditions: Adjust your watering schedule according to temperature, humidity, and sunlight exposure.
Tree species: Research the specific watering needs of your bonsai species, as some require more frequent watering than others.
Pot size and drainage: Verify your pot has adequate drainage holes to prevent waterlogged soil, and adjust your watering schedule accordingly.
Seasonal Pruning Reminders
Bonsai trees require regular pruning to maintain their shape, promote healthy growth, and encourage a balanced root system, with seasonal adjustments necessary to accommodate changing environmental conditions.
As a bonsai caretaker, mastering the art of adaptation is vital to stay attuned to the rhythms of nature, adapting your pruning schedule to sync with the tree's growth patterns.
During the active growing season, prune regularly to maintain shape and encourage new growth.
As the seasons shift, adjust your pruning techniques to accommodate the tree's changing needs.
In the spring, focus on promoting new growth by pruning back vigorous shoots.
In the summer, prune to maintain shape and encourage ramification.
In the fall, prune to prepare the tree for dormancy, and in the winter, prune to maintain shape and promote backbudding.
Frequently Asked Questions
How Often Should I Repot My Bonsai Tree?
Determining the ideal repotting frequency for your bonsai tree depends on factors such as species, age, and growth rate. As a general rule, most bonsai trees require repotting every 2-5 years, but some may need more frequent or infrequent repotting.
Can I Use Regular Potting Soil for Repotting?
While regular potting soil may seem suitable, it's not ideal for bonsai repotting due to its dense, water-retentive properties, which can lead to root rot and hinder proper drainage.
What if I Accidentally Damage the Roots During Repotting?
When accidentally damaging roots during repotting, remain calm and act promptly to minimize harm. Gently prune damaged areas with sterile tools, and apply a rooting hormone to stimulate new growth, ensuring the bonsai's continued health and stability.
Can I Repot My Bonsai in the Same Season I Prune It?
As the seasons unfold like a delicate petal, timing is vital: generally, it's best to repot your bonsai during the dormant season, avoiding simultaneous pruning to prevent shock and promote healthy recovery.
Should I Fertilize My Bonsai Immediately After Repotting?
When repotting, it's generally recommended to delay fertilization for 2-4 weeks to allow the bonsai to establish itself in its new environment, as immediate fertilization can cause undue stress and potential root burn.
Conclusion
As the bonsai settles into its new home, the gentle rustle of its leaves and the subtle scent of damp earth evoke a sense of serenity, akin to a soft dawn breaking over a tranquil landscape.
With each carefully tended step, the bond between tree and cultivator deepens, fostering a harmonious balance that yields a miniature masterpiece.
By following these step-by-step instructions, novice enthusiasts can confidently navigate the repotting process, ensuring their bonsai receives the care it needs to flourish, its beauty unfolding like a delicate, intricate dance.
