
Having an English translation of ‘moss ball’, the Kokedama ain’t only intended for a poor man. It’s an all-around gardening technique suitable most for minimalistic spaces. It’s a beautiful way to diversify your bonsai experience!
The Kokedama is quite complicated yet a fun-filling activity for those who are fond of gardening. It’s a beautiful Japanese art with a touch of style and serenity that reflects their amazing culture and traditions. This is a must-learn for otaku and garden lovers out there.
If you want to know the secret in a Japanese way, then let’s ready to start this Kokedama tutorial. Tatakai!
What is a Kokedama?
Kokedama (苔玉) is an ancient style of gardening began since 16 AD in Japan. Its origins are unknown yet it said that the planting art has emerged after the development of the bonsai and kusamono botanical techniques.
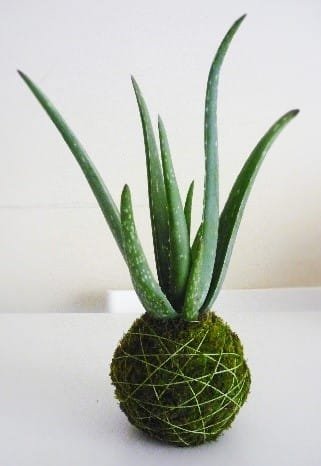
Consequently, it could be created with multiple types of plant species. Most notable plants that are used include ferns, bamboos, succulents, and even flowering plants.
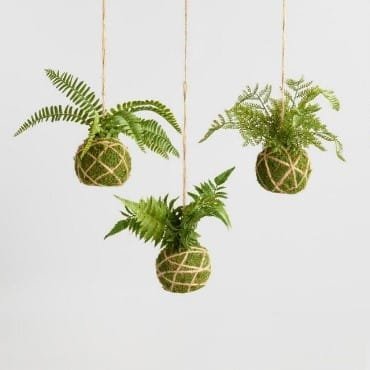
Unlike any other gardening styles, the Kokedama is uniquely built to eliminate the relevance of pots during planting. Its round-shaped appearance is intricately filled with clay mud and moss to gain stability and growth to the plant attached within it.
The Kokedama exhibits a flexible and decorative planting strategy. It could be suspended or hanged into ceilings or lay on a platform.
As of today, Kokedama gardening has evolved and become a globally known planting style. It has been unknowingly used in various offices, homes, and schools.
How to Choose Plants for Kokedama?
For easy transfer, it’s essential that you’ll choose a plant that has simple and small root connections. Also, choose a plant that would not grow more than a meter since the soil is quite limited for this type of gardening.
When selecting a plant for kokedama, it’s important that the location will be healthy for the plant to put upon. Sunlight exposure should be sufficient to be able to thrive on its entire duration.
For indoor growing with minimal sun exposure, recommended plants for use includes the following;
- Pothos
- Philodendron
- African Violet
- Begonia
- Ferns
- Grape Ivy
- Dracaenas
- Cyclamen
- Elephant’s Ears
- Rabbit’s Foot Fern
- Peperomia
- Prayer Plant
- Creeping Fig
For outdoor growing with full shade exposure, these plants are highly advised for use. This includes the following;
- Christmas Cactus
- Oregano
- Parsley
- Croton
- English Ivy
- Wandering Jew
- Sedums
- Donkey’s Tail
- Aloe
- Basil
- Kalanchoe
- Thyme
It is also a vital consideration of the selection on the manner of planting it. There are plants who aren’t suitable for hanging as it will not grow intuitively. Here are a few plants that you should not hang upon doing kokedama. This includes the following;
- Cacti
- Ming Aralia
- Succulents
- Flowering Plants
For hanging, it is important to choose plants that need a minimal root space. The plants above have complex root details, undesired for this kind of planting. Highly recommended for planting kokedama through hanging are ferns, pothos, and peace lily.
How to Create a Kokedama?
Looking at a kokedoma display, a lot of you just think on quitting to even get to start on it. The gardening setup seems complicated and difficult to do. However, the secret is that kokedoma requires only not much of an effort. Though, it requires timing, appropriate materials or tools, and patience to be successful in making it.
For starters, these materials must be gathered and bought to botanical stores in order to begin the kokedama gardening.
- Bonsai Soil
- Sphagnum Moss
- Peat Moss
- The selected plant
- June Twites
- Scissors
- Water
STEP 1. Finding the right mixture for the soil
It’s the most critical part of the process. Thus, it’s essential that the soil should adhere well as the plant would spend its whole life ‘potless’. If you’re having a problem with getting the right proportions for the soil, you could buy this traditional soil type called ‘akadama’ to local botanical stores.
To get an appropriate combination of soil using the available materials you have. Mix the peat moss and bonsai soil in a bowl with a ratio of 7:3. After then, slowly add water until it’s gotten sticky and consistency develops within the soil.
STEP 2. Forming the ‘moss ball’
While wearing gloves, clump out the adhering soil until you’ll be able to mold a round-shaped ball. It’s essential that the soil will hold together and its consistently pressurize as needed. As a test for firmness of the moss ball, toss it high into the air repeatedly. It should not get deform or break as it should be avoided.
STEP 3. Preparing the plant
Assuming the plant is still on the pot, then slowly remove into it. Make sure that the roots aren’t affected or gets damaged while doing this operation. Then, clean it thoroughly removing the excess soil. After that, the plant is ready now to be replanted to the moss ball prepared.
STEP 4. Replanting the plant
Split the moss ball into half and placed the plant’s roots into the center of it. Then, gently firm out and pack the plant into the soil as needed. It should be still round in shape as it was before.
STEP 5. Wrap the soil with moss around it
Dampen the sphagnum moss with warm water in a few minutes. This will keep the moss adhered to the soil. Then, wrap the moss gently to the soil until it gets stable.
STEP 6. Secure to kept it tight
Using the June twits or monofilament fishing lines, wrap it around the ball in all directions. It’s essential that it should be kept tight to prevent dislodging the moss or even the soil. If you wanted to hang your kokedoma, you could place a shallow dish to assist it during those times.
Taking Care of Kokedama
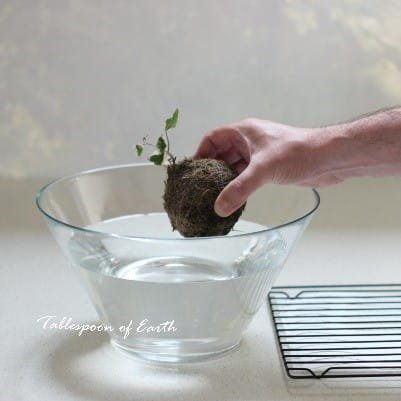
The most essential part of caring the plant is watering it. Usually, the plant is often watered about once per week. Unlike any other plants, this gardening technique should be watered through soaking it in a bowl full of water for about 30 to 45 minutes. Nevertheless, if it feels that the soils are very dry, then water it again with the same procedure.

