The respected Indian philosopher, writer, and speaker Jiddu Krishnamurti share an inspiring insight on the way people barely ever get to “look deeply into the quality of a tree.”
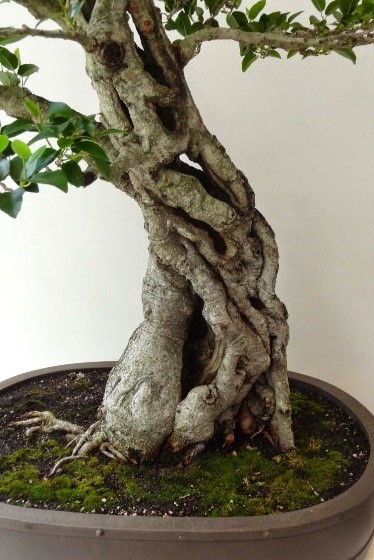
But for bonsai tree gardeners, the majestic wisdom and beauty of trees reach deep down to the bones. A bonsai practitioner should be knowledgeable on how to thicken a bonsai trunk, for it is the trunk that gives a miniature tree an authentic, natural, organic appearance that represents the core values of the art of bonsai.
Thickening a Bonsai Trunk: The Best Working Techniques

1) Split the Trunk
By splitting the trunk from the very base, you can get immediate results. However, it is crucial that this particular technique for thickening the trunk of a bonsai is only applied to trees that are able to recover from such type of a traumatic injury.
For example, Boxwood, Junipers, (most) Ficus varieties, as well as Elms are capable of responding very well to the split trunk method.
Do make sure that the tree you are about to split at the base of the trunk is healthy and vigorous, though, or else, it may still have a troublesome time with recovering.
Splitting the trunk should happen at the beginning of the growing season.
Start by taking the tree out of the pot and remove the soil of the roots by washing it away. Using a trunk splitter, wood chisel, rotary tool or a saw, split the trunk from the bottom up.
To help keep the split trunk apart, you can use wire or wood wedges. Let your tree take the time to heal. If you want to speed up the healing process, you can temporarily opt for placing your tree in an oversized pot. Doing so allows the roots to enlarge and be better managed in the future.
Video by: Bonsai Iligan – Bonsai Diary: Split Trunk Tamarind Repot
Source: youtube.com
2) Induce Swelling
An ancient Japanese technique used by some of the most highly respected bonsai masters, you can make use of a wire tourniquet with the clear intention of inducing swelling.
When placed around the very base of the tree, you can create an excellent tapered trunk, even with tree species with trunks that are not naturally tapered, which is the case with Chinese Elms, for example.
Do keep in mind that this method can grant you very quick results. If applied to fast-growing species, you can expect to see the trunk thickened within a single growing season.
However, you also need to remember that this method leaves permanent scarring. Apply it with moderation and caution.
3) The Sacrifice Branch Technique
You can run one or more sacrifice branches in order to thicken the trunk of your bonsai.
A sacrifice branch refers to carefully selected branches that a bonsai practitioner allows to grow as thick and as long as possible. By doing so, the sacrifice branch causes the trunk to thicken.
Once the desired thickness of the trunk is achieved, the sacrifice branch is sacrificed, or in other words, cut off. The process can be repeated over and over again. It gives best results when you grow your bonsai either directly into the ground outdoors or in large pots so that the sacrifice branches can grow bigger, therefore, helping the trunk thicken significantly.
You can grow a sacrifice branch or branches at the very top of your bonsai tree, and this will help for the entire trunk to thicken. If sacrifice branches are located at the lower parts of the tree, it is in the lower sections where the trunk will be thickened.
The sacrifice branch technique is most commonly used on Pines. It can be used on other tree species, though.
With Pines, it is good to consider their apical dominance. Because of the apical dominance, pines tend to focus their entire growth energy away from the lower branches in favor of the top of the tree. Thus, sacrificing lower branches does not produce the best results with Pines.
Video by: Igor and Frankenstein – Bonsai: sacrifice branches
Source: youtube.com
4) Intentional Scars
You can intentionally scar a pine or juniper bonsai tree to help the trunk thicken. Using a carving knife, you need to cut vertically through the bark until you reach the sap layer.
It is by producing scar tissue that the tree will thicken its trunk as the time passes. But do not forget that these scars are a type of injury. Thus, limit yourself to carving 3 and up to 4 vertical lines as not to cause your tree more damage than good.
Cut at the exact trunk area that you want to thicken, for example, the base if it is the base that you want to become fuller and stronger.
5) Growing in Large Pots
When the pot of your bonsai is large enough, the miniature tree’s roots will be able to reach deeper into the soil in search for nutrients. As a rule of thumb, the longer and thicker the roots, the thicker the trunk.
If you have the chance of placing your bonsai tree outdoors directly into the ground, then this can be a fantastic choice, especially when combined with the sacrifice branches technique. Large pots can work fine, too, then again, resulting in a visibly fuller trunk when in conjunction with the sacrifice branches method.
How to Thicken a Bonsai Trunk: The Takeaway

Today, your bonsai tree might be still far away from reaching its fullest potential but don’t forget to enjoy the delicate beauty of this momentum, as it will inevitably become only a sweet memory at some point. Any bonsai enthusiast can learn how to thicken a bonsai trunk – just remember that good things take patience, care, and dedication.


